
Using Outlaw Ed (The Editor)
Introduction
After a couple of failed attempt at creating a useable and userfriendly editor, we decided to start over from scratch while learning from our mistakes. Outlaw Ed is what came out of this effort, this editor has been thoroughly tested throughout the entire development phase and as a result quick input from the testers this is an editor that's actually worth the name editor. Furthermore, due to the testers being involved from the beginning, this program is very stable. So what exactly is it that makes us this confident, what does it do ... make coffee while you wait? - No not quite, the coffee you'll have to handle yourself, but we're sure you're gonna be drinking alot of it while staying up late trying out new cool things.
So why so great
First up we've taken the best from all the old editors since the early text based editor up to and including the prior
wysiwyg editor. This has led to a user interface that is both friendly and well designed (which you all can thank Dirty
Harry for, he was on my ass all the time when things didn't meet his standard :)).
Here are some of the main highlights
- It delivers your wallpaper in the editor window so you right away know if something looks right
- Everything is added using popup menus leaving behind the much cumbersome drag and drop plugin to create style (it's still in there if you're like it better, why have one, when you can have both ;) ), it also speeds up adding new things to your config so you can spent time on customizing them instead.
- All toolwindows are capable of alphablending so they will disturb your vision the least.
- The object inspector has been made more friendly (provided the plugins support it), adding a new font style to use a font dialog, so the previous 6 different parameters used to setup a font has been reduced to a mere two (color is still seperate, since you'll probably be spending alot of time tweaking your colors, we felt it better and faster if you didn't have to open the font dialog each time you needed to adjust a color). And plugin coders have the ability to write their own OI dialogs to really customize and service what you alter.
- A code snippet window has been added, here you can alter your raw CML for advanced changes or just basic hardcore style and then watch your config take shape. (This feature is only for the advanced users)
- Code template system will allow you to store segments of your cml (objects), to a ... uhh call it a long term clipboard, for quick reuse of already tweaked objects
While this is all so great, there is however still a couple of things it will not do
- Linked sensors, these are not supported period ... loading a CML that uses linked sensors will pure and simple be likely to crash the editor.
- CMLx, the cml extending plugins are not supported ... they don't interact with the editor, you can write in the tags in the code snippet window, but you'll not see a change in the editor.
- Multiple monitors, if you're primary monitor is on the left and the secondary is on the right it should work. But if your primary is the right one and the left is the secondary it will not work.
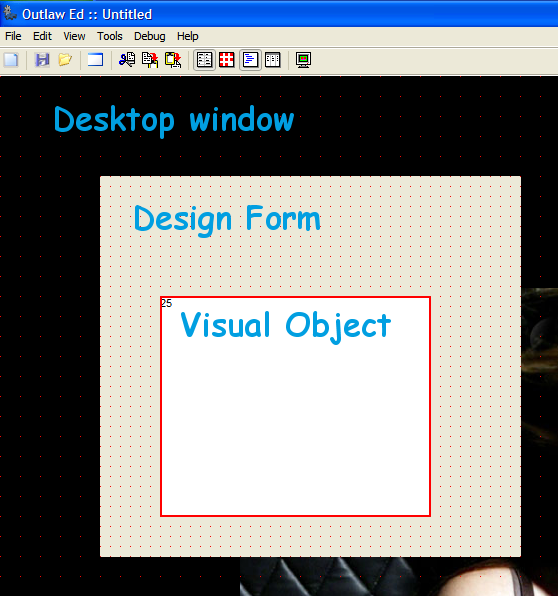
So let's take a look at the main window, one we like to call the desktop window.
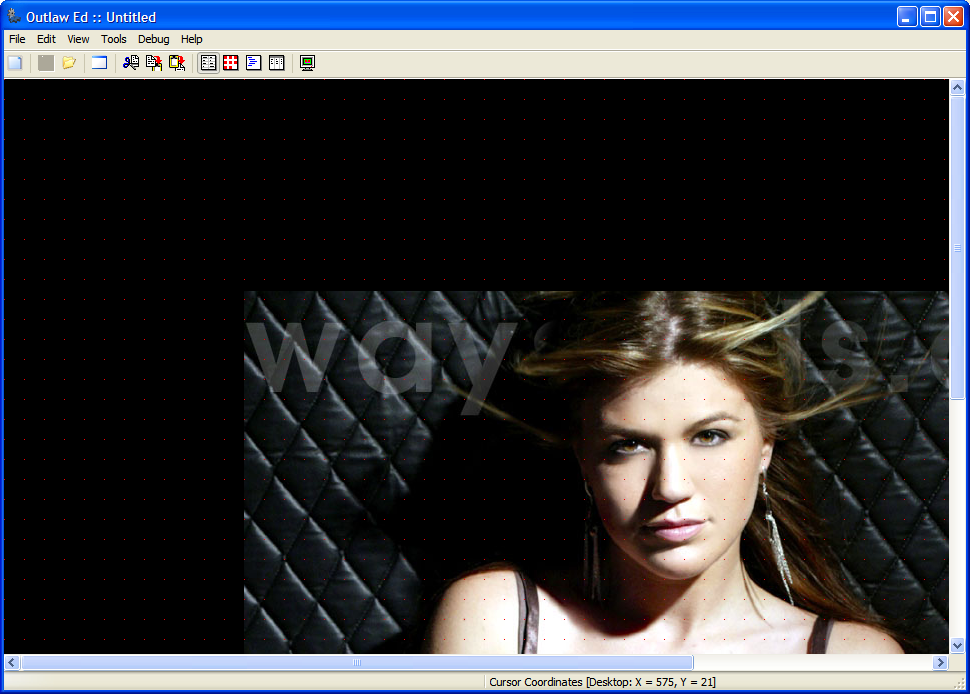
A fairly straight UI design, with the menu and the status bar. The representation of the desktop has small red dots in this
image, it's the grid which forms can snap to (both grid and snapping can of course be turned off in the preferences, but we'll
get to that later).
The statusbar is divided in two, the left side will show hint about the item your mouse cursor is hovering over. The right side
shows the pixel coordinates for cursor, in relation to various items.
Now for a brief overview of the toolbar

 Open's the new items dialog
 Save the current project
 Load an existing project
 Adds a new design form to project
 Cut object to clipboard
 Copy object to clipboard
 Paste object from clipboard
 Toggles the Object Inspector Window
 Toggles the Plugin Palette Window
 Toggles the Code Snippet Window
 Toggles the Sensor Listing Window
 Toggles fullscreen editing
The tool windows
In order maximize workspace we have kept the toolwindow approach, which some people might find a bit strange at first, but it should only be a matter of a litte adjustment. The cons about this are that you can move around these windows so they don't cover what you're currently working on. They all offer alpha blending so you can see through them (the trackbar at the bottom of the windows will alter blending). They also offer the ability to roll up so you only see the titlebar for them, this can be done in 2 ways, you can either doubleclick the title bar or you can in preferences select auto rollup, which will do it for you automatically when the window looses focus.
There are 4 tool windows at this time, but I'll only gone into details with 2 of them.
The windows are
- The Object Inspector
- The Code snippet window
- The plugin palette (where you can drag plugins from if you don't like the popupmenu approach)
- The Sensor listing window - it will display all the sensor (with values, update intervals and parameters) you currently have in your config.
The object inspector
With our object like design system, this one is almost impossible to avoid. It's where you can alter parameters.

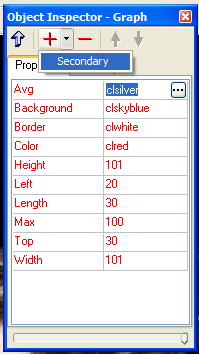
As you can see it consists of a toolbar and two tabs. The Parameter tab will list all the parameters for the currently selected
object, and their values which you can alter. These values may have either a dropdown list with a selection of the values possible
for that specific parameter. Or as in the case on the image a button with 3 periods, clicking this will display a dialog that will
ease the selection either by presenting a color dialog, a font dialog or something completely different, the main goal is to ensure
you don't have to spent much time typing in stuff. Which parameters presents what, is entirely plugin controlled. A plugin coder
may leave them out all together, but then the plugin probably wouldn't be used very often because it would be a pain to set up. All
parameters are color coded based on their importance to the plugin, there are 3 parameter types.
- Required (Default color red)
these cannot be deleted, they are required for the plugin to function correctly. - Optional (Default color green)
These can be deleted, to make a smaller CML file. Deleting them will use plugin defaults. - Non-Recognized (Default color White on red background, to catch your attension)
These are not recognized by the plugin and thus may not be needed at all, if you've recently updated a plugin and you see a blue parameter it's no longer used and should be safe to delete.
On the toolbar you'll see five buttons. From left to right
- The blue arrow, this will take you to the parent object (from general to visual to form, this will quickly allow you to alter a parameter on the parent object).
- The + button, this is to add a parameter not in the list. You may add what ever parameter you wish by clicking the button. But
to make things easier it has a dropdown menu which will list the parameters the plugin is missing. After updating a plugin
looking at the downdrop menu might reveal new parameters and thus customizing options.
- The - button, will very appripreatly delete the selected parameter (by selected I mean the parameter which you are currently editing
- The red up arrow, this will allow you to rearrange item order on the content list
- The red down arrow, like the up allow, but opposite direction ;)
The +/- button are grayed out when on the content tab and the red up/down arrows are grayed out when on the parameter tab.
If you want a brief description of a parameter hold the mouse cursor over the parameter name, press and hold the right mouse button.
On the content tab you'll see a list of all the objects place on the selected object (visuals on a form, sensor and text on a visual)
Right clicking will bring up this menu
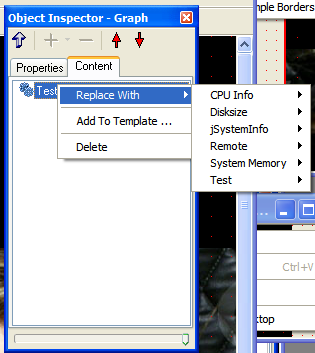
If you select a sensor you'll be given the option to replace it with another sensor, this will save time because you no longer have
to delete and recreate the sensor, 2 simple clicks will do it for you.
The "add to template" option will be covered later.
The Code Snippet Window
The code snippet window is a very powerfull tool in the right hands and can be almost frightening in the wrong hands. Therefore I'll
start by stressing that you should only use this tool if you have a general understand for CML. It will show the object you currently
have selected, in pure CML. It will start at the base node and then provide all the subnodes for the object.
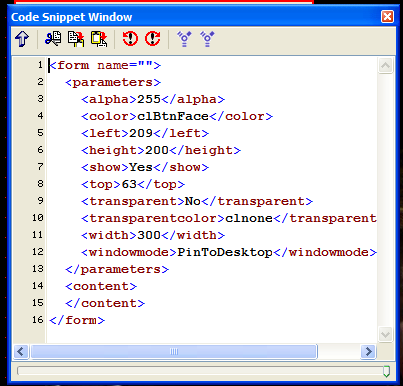
Let's cast a quick glance at the toolbar for this window.
From left to right.
- The blue arrow
Just like in the Object inspector it will take you to the parent, thus showing you the tag for the parent. - Cut, Copy and Paste
Should need no introduction - Undo
Undo changes - Redo
Redo undone changes - Find
Will give you a find dialog to quickly help you find what you're looking for - Replace
Will present you with a search and replace dialog for alter the same thing in multiple places
We're sorry about the icons on the last 2 button, but we've been unable to locate suitable icons for those.
The snippet window supports bookmarking, pressing Ctrl+Shift+[0 - 9] will place a bookmark, pressing Ctrl+[0 - 9] will take you to a placed bookmark. Currently bookmarks are place per tag, meaning when you change the base tag the bookmarks will be lost even if you revert to the tag.
As soon as you start typing in the text editor it will provide you with 2 options, "Discard Changes" and "Apply Changes". Discard changes will revert the CML to how the tag currently looks like, you will of course lose the changes you have made. Apply changes will attempt to adapt the changes into your project, if a CML error is detected it will complain about it and inform you where and what might be wrong and the changes will not be adapted, if you're unable to correct the error we recommend you press the discard changes button and seek other ways of achieving what you want. A general recommendation here is that you attempt to alter a small tag as possible to increase the speed of it, so if you wanna alter a sensor, don't select the form where it's loaded, select the sensor.
The popup menus
As I've already mentioned much of Outlaw Ed is controlled by using popup menus, so it seems only fitting that we take a look at the most commonplaced ones. Those needed for adding objects to your config.
First a little terminology to help increase your understanding and help rule out misunderstandings, which have occured frequently
during testing.
Let's start with the popup menu you'll find on the desktop window.
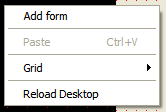
This one is very simple
- Add Form
This will of course add a design form to your design area. - Paste
This will paste the object in the clipboard, if any ... none is available in this picture so it's grayed out - Grid
This submenu will allow you to quickly change some grid settings (for a full setting ability, you'll have to look in the preferences - Which we'll cover a bit further down) - Reload desktop
If you alter desktop color or wallpaper clicking this item will reload the desktop to it's new appearence
We'll continue with the popup menu found on design forms
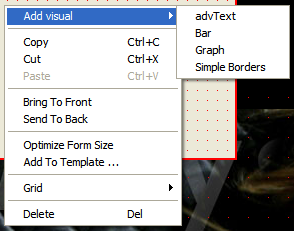
This one is a little more complex.
- Add visual
This will allow you to add a visual object. All installed visual plugins are represented in the submenu, if you can't find what you're looking for, it's not installed. - Copy
Cut - will copy or cut the selected form. - Paste
Will a visual object onto the form, if the item stored in the clipboard isn't a visual object or no object is place in the clipboard the item will be greyed out. - Bring To front
This will bring the selected design form to the front of the screen, meaning it's no longer covered by other design forms. - Send to back
This will send the selected form into the back, meaning it will be covered by other design forms. - Optimize form size
This will resize the form to the smallest possible without repositioning any visual objects placed on the form. If the form is transparent keeping it as small as possible will help reduce cpu imprint when config is ran in the core. - Add To Template
This will add the selected design form to the code template. (We'll cover the code template a little further down) - Grid
The submenu will allow you to quick access some grid settings for the design forms grid, the design form grid works independently of the grid on the desktop window - Delete
This will delete the selected form with all it's objects. (This cannot be undone, so be certain before you do so)
And finally we'll cover the popup menu that will appear on visual objects<
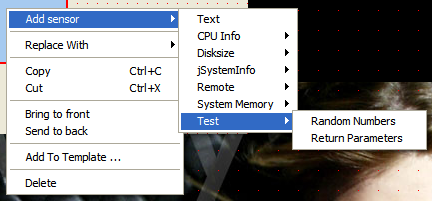
The is easily the most complex menu of them all.
- Add sensor
This will allow you to add a sensor, the submenu holds a install general plugins and their sensors. It also holds "Text" which is for placing static text. - Replace with
This will allow you to replace the visual without losing the sensor content you have on it. - Copy & Cut will copy or cut the visual to the clipboard
- Bring To front
This will bring the selected visual object to the front of the design form, meaning it's no longer covered by other visual objects. - Send to back
This will send the selected visual object into the back of the design form, meaning it will be covered by other visual objects. - Add To Template
Will add the selected visual objects to the code template. (It will be covered a little further down) - Delete
This will delete the selected visual objects with all it's attached sensors. (This operation cannot be undone, so be certain before you do so)
Some plugins may insert items of it's own, so if you see items not covered in this list, please refer to plugin documentation.
Code templating
The easiest way to explain the code template is as a permanent clipboard. You can store a presetup object to the code template and then by clicking the new item button on the toolbar, you'll be able to insert it later.
The code template dialog looks like this
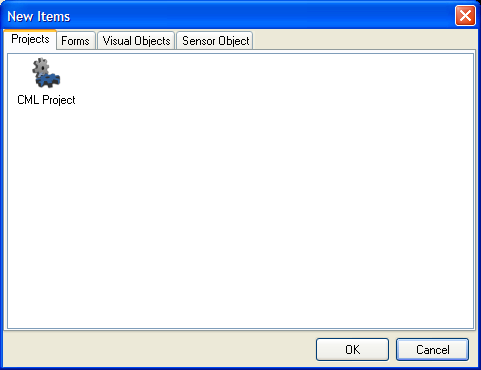
The item shown here isn't part of the template system, it will just create a new CML project. The three tabs (Forms, Visual objects
and sensors objects) will store their own type for fast referencing, if you add a form to it, it will be place on the form tab, add a
visual object it will be placed on the visual objects tab, etc.
To add an object to the code template, you'll need to use the menu items around the popup menus. To add them back into the project there
are a couple of restrictions
You can add a design form from any selected object. Visual objects can be added from selected sensor objects, visual objects and forms ...
it will just go back to the parent until it hits a design to place it on. Sensor objects can only be added to a visual object.
So how do you add objects to the code template
To add an object to the code template, you can access the popup menu for that item and press the "Add to template" item (Please refer to
menu documentation above for details). When you do this you'll get the following dialog.
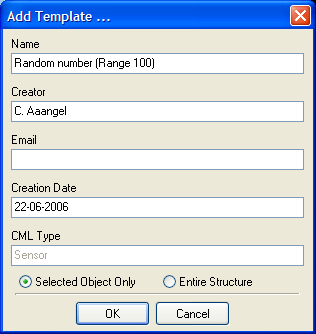
Let's take the items from the top
- Name
You must define a name for the code template, this is the name that will be shown on the code template selection dialog. (Sticking with a descriptive name might be a good idea) - Creator
Your name, if you feel like sharing your templates - Email
If you want praise on your work - Creation date
Just for a little reference - CML Type
This is readonly, it will just tell you on which tab the template will be presented on in the code template dialog - Selected Object Only
This will only save the object you have selected, with it's parameters, but child objects (visual objects on a design form and general objects on a visual objects) will not be added to the template. - Entire Structure
This will save the entire object along with it's child objects attached.
Preferences
The editor is designed to work and be friendly out of the box, so the most common options that our testers have used thoughout their testing have been adapted. But Outlaw Ed supports a wide variaty of options that can be tweaked to change behavior and perhaps suit your likings better.
The Default Values
All plugins come with their own standard as far as parameters go, but you alter those values under default values in the preferences.
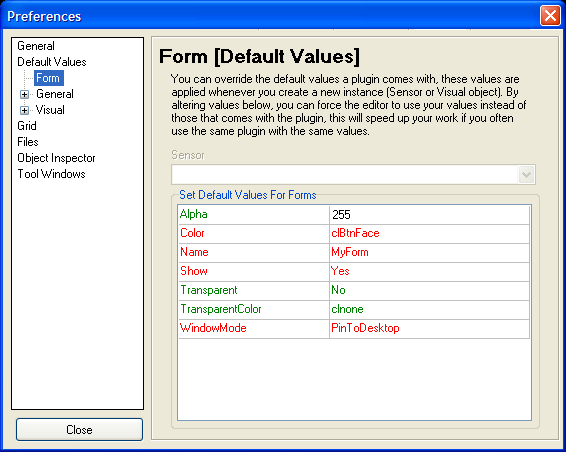
The design is like the Object inspector, the only difference is that you are altering values on an object that you cannot see, they will be used
as the standard next time you create an object of that type.
File options
Here you'll find a couple of options that are linked to files.
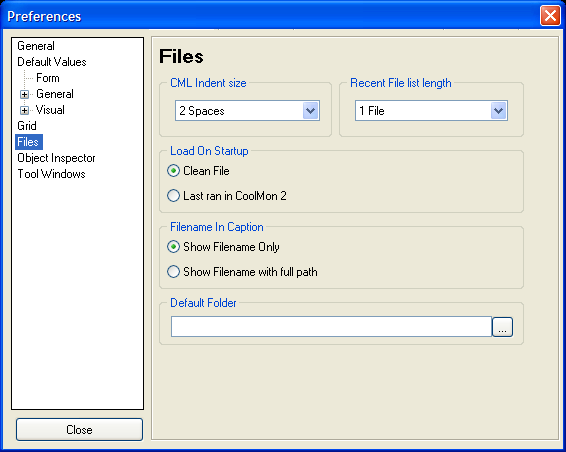
- CML Indent Size
This is the number of spaces used to indent for each new level in the cml file. - Recent File List Length
This determines how many files that will appear in the reopen submenu under files. - Load on startup
What would you like Outlaw Ed to do when it's loaded. Start with a clean file or with the last config file ran in the core. - Filename In caption
What should be shown in the caption bar on the desktop window ... Filename with full path or just filename. - Default folder
If you have all your CML files in some specific location, you can add that location here, then load and save dialogs will automatically start in the folder, thus reducing the time you have to navigate.
Grid Options
The grid on both the Desktop window and the design forms can be customized, here you can do that.

- Background Grid
Is the grid that appears on the desktop window. - Form Grid
Is the grid on the design forms. - Show grid
Show the grid or hide it ?! - Snap to grid
Should movement of objects with the mouse snap to grid points ? (If the grid is hidden, this is automatically deactivated) - Grid spacing
The number of pixels between points. - Appearence
Dots or lines, the lines might be easier to see, but they take up a lot more space. - The Red square
Click on it to change the color of the grid.
Object Inspector Options
Here you can change some of the colors on the object inspector.
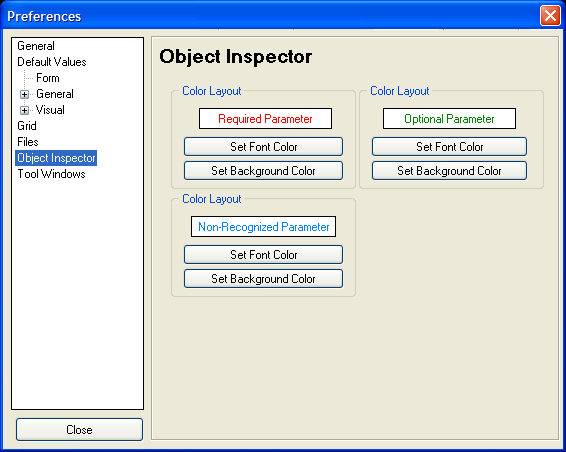
- Required Parameter
This indicates a parameter the plugin needs to work, these cannot be deleted - Optional Parameter
This indicates a parameter that the plugin doesn't necessarely need in order to work. - Non-Recognized Parameter
This is a parameter that appears with the object, but the plugin doesn't have any use for.
Tool windows Options
All tool windows can be customized to a certain degree, here you'll find a list and the abillity to alter them to your likings.
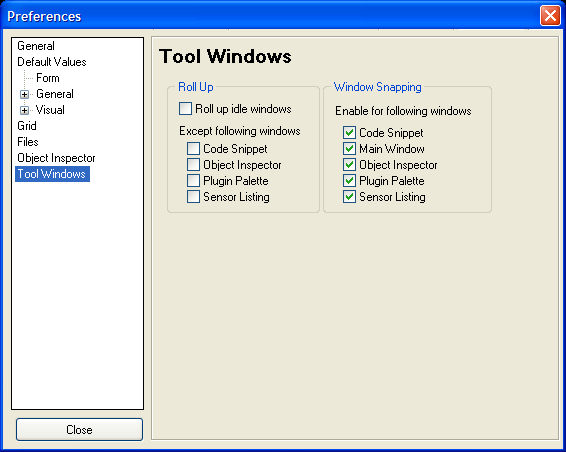
- Roll up idle windows
If you want to minimized the impact the toolwindows have on the design area selecting this will rollup all toolwindows that aren't in use. You'll have to click on the caption bar to get it to roll down again. You can then decided whether or not it should apply to all windows or you want to make an exception. - Windows Snapping
Also known as magnetic forms. Here you can choose which forms should snap to each other.
PlugIn Manager Link
Lastly, there is in the tools menu on the desktop window a link to the plugin manager for easy access to plugin management. However
since everything must be unloaded for the PM to work, the editor will close and then load the PM, when you exit the PM it will relaunch
the editor.